A black dress can make turquoise-colored jewelry look crisp, graphic, and intentional, but it can also expose weak proportion. The difference is rarely a mysterious fashion rule. It comes from where the jewelry sits, how much area it covers, what else occupies that zone, and whether the combination survives ordinary movement.
This guide tests those questions with the Turquoise Western Cuff Bracelet Set and the Turquoise Western Statement Earrings. Product names describe visible style direction; they do not independently verify natural turquoise, vintage age, metal content, geographic origin, maker, or cultural affiliation. Confirm materials, dimensions, construction, fit, and care for the exact option.
Quick Answer: What Works and What Does Not
What works: one clear focal zone, verified scale, visible breathing room, one distant echo, and a movement test. What does not: stacking every motif, assuming cuffs fit because they are open, matching colors from screens, adding statement earrings to a busy neckline, or treating “Southwestern” as proof of material or origin.
Begin with either the wrists or the face. If cuffs lead, keep earrings and neckline restrained. If earrings lead, reduce wrist coverage. Use the black dress as negative space rather than a reason to fill every area with contrast.
For terminology and responsible product evaluation, read the public guide to Western jewelry motifs, styles, materials, and selection.
Map Two Axes: Location and Motion
Draw a simple grid. Across the top, write face, neckline, wrists, waist, and feet. Down the side, write still, walking, sitting, dressing, using a phone, and carrying a bag. Every accessory occupies one or more cells. A successful look stays clear and comfortable across the grid.
The cuffs concentrate color and texture near hands. Their closest competitors are sleeves, rings, bag hardware, and a belt. Statement earrings occupy the face frame and compete with hair, glasses, hats, collars, and necklaces. The dress neckline and sleeve length decide how much black space separates these zones.
Photograph the dress alone before adding jewelry. Note sleeve opening, visible hardware, waist detail, surface sheen, and collar shape. This baseline reveals whether the dress already contains a focal point.
What Works: A Wrist-Led Composition
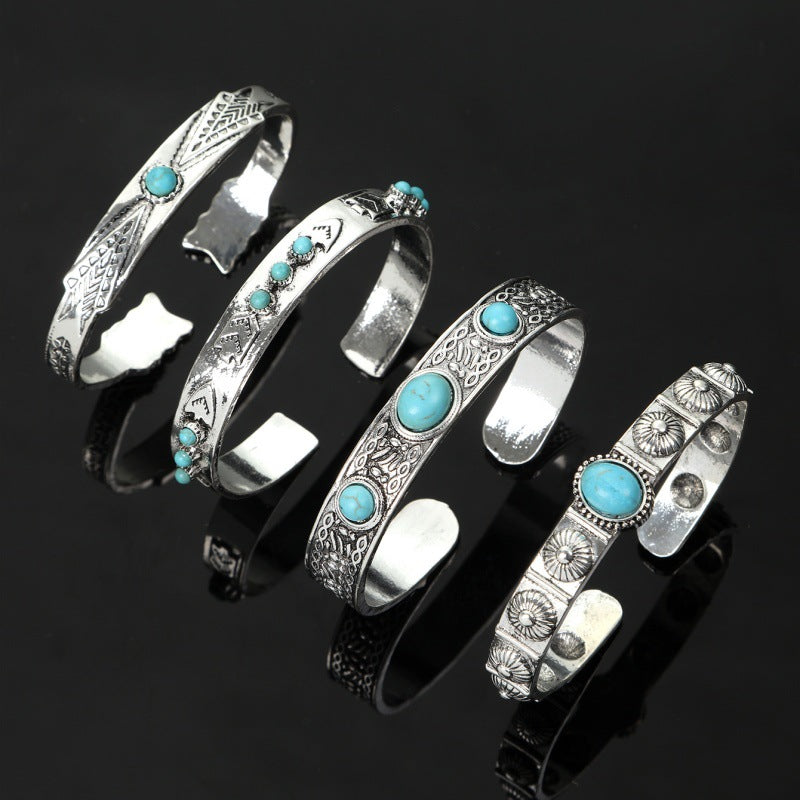
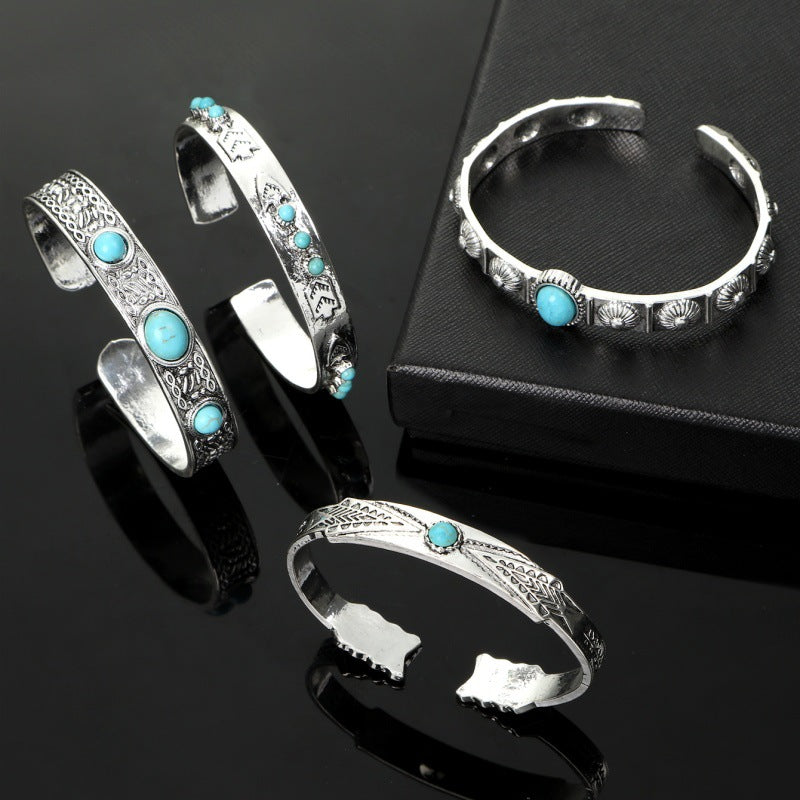
The bracelet page currently describes a set of four open cuffs with turquoise-colored accents and varied vintage-inspired motifs. The visible selector says “4Set.” The page does not visibly disclose inner circumference, opening width, band width, individual weight, component materials, finish, construction, or care.
Start with one cuff, not all four. Place it on the wrist opposite the bag so hardware does not collide. Wear the dress with a bare neckline and simple earrings. Add a second cuff only if the first has verified fit, stays in position, and does not interfere with the sleeve or hand movement.
A three-quarter or sleeveless dress often leaves a clear wrist field, but actual openings and bracelet dimensions matter. A fitted long sleeve may work if the cuff sits beyond the fabric without catching. A voluminous cuffed sleeve can compete visually and physically. Test the exact garment.
Request measurements and the approved fitting method. “Open cuff” does not mean unlimited adjustability, and repeatedly bending unknown construction can cause damage. Ask whether the four pieces share the same dimensions and whether they are intended to be reshaped.
What Does Not: Treating Four Pieces as One Mandatory Stack
A set offers options, not an obligation. Wearing all four beside rings, a decorated clutch, and embellished sleeves can create one dense block. Physical contact between components may also affect some finishes. Build in stages and photograph each stage from full-body distance.
Do not divide the set across both wrists merely to create symmetry. That can repeat the same strong information on both sides and leave no quiet hand. First try two on one side, none on the other, and a small ring as a distant echo. Then compare comfort and balance.
What Works: Face-Level Earrings With a Quiet Middle
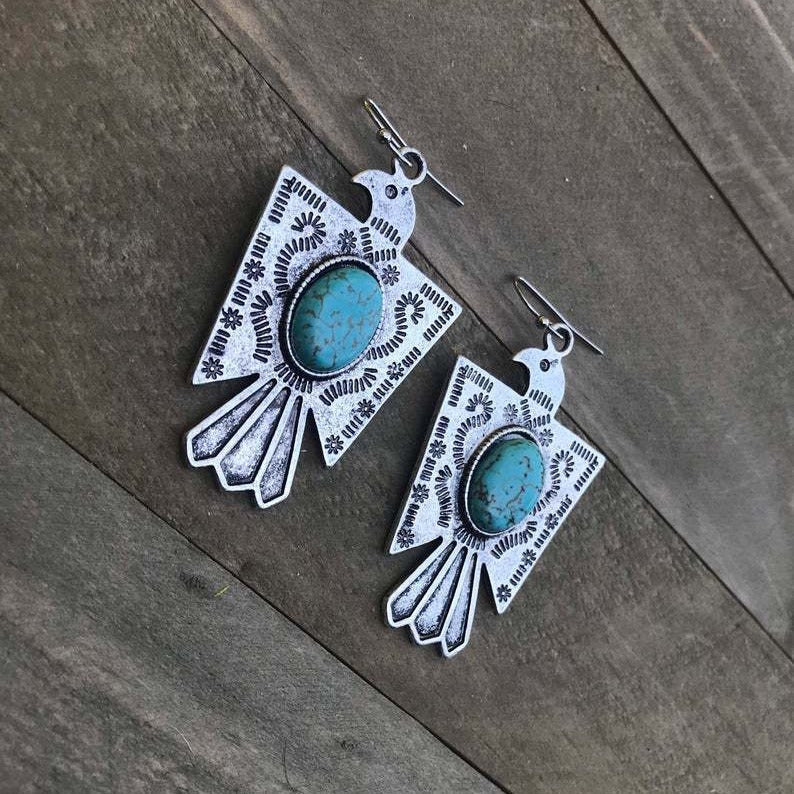
The current earring page describes a bold Western silhouette with turquoise-style center stones and vintage-inspired detailing. One color option is visible, but exact height, width, drop, profile, per-earring weight, closure, materials, finish, and care are not visibly stated.
Let the earrings lead with hair positioned to avoid catching and a simple neckline. Skip the necklace during the first test. A clean black field beneath the face gives the sculptural shape enough contrast without repeating turquoise color elsewhere.
Request exact measurements, weight per earring, closure type, post or hook material, decorative materials, and care. Turn the head and put on outerwear. Check shoulder, collar, and hair clearance. Remove the earrings if they pull, irritate, catch, or feel insecure.
What Does Not: Crowding the Face Frame
Large earrings, a wide necklace, a high decorated collar, a hat, bold glasses, and voluminous hair can all be individually appealing. Together they may obscure the earring silhouette. Choose one face-level leader and one support signal.
A high neck can provide a useful black background if it is plain. It becomes a competitor when it has shine, beads, hardware, or a complex edge. Photograph hair up and down with the real dress instead of relying on a product close-up.
Three Outfit Formulas That Work
Formula A: One Cuff, Bare Neckline
Use one verified cuff, small neutral earrings, clean shoes, and a bag carried on the opposite side. This emphasizes gestures without turning the whole set into a requirement.
Formula B: Statement Earrings, Quiet Wrists
Use the earrings alone at face level. Keep wrists bare or add one narrow noncompeting bracelet after a contact test. Let shoes or bag echo geometry rather than color.
Formula C: Two Cuffs and Small Face Echo
Choose two cuffs with different visible scale, then use a small earring with limited movement. Avoid a large necklace. Confirm that the dress sleeve and bag do not contact the stack.
For more complete wardrobe formulas, use the public Western jewelry styling guide for dresses, denim, boots, and workwear.
Color Relationships That Work
Use color distance instead of exact matching. Turquoise-colored details can stand alone against black, connect to cool denim outerwear, or echo a small blue-green bag detail. Screen color and photography are not reliable enough for exact matching.
Metallic-looking hardware should be treated as appearance until materials are documented. You can coordinate apparent warmth or coolness visually without naming the metal. Check the real pieces together in the same light after delivery.
Motif Combinations That Do Not Work Easily
Several large florals, crosses, skulls, conchos, and geometric motifs can compete. Select one motif family to lead and one abstract echo such as curve, line, or apparent finish. Avoid inventing a cultural story to make unrelated forms seem connected.
“Southwestern” and “Western” are broad style terms. They do not authenticate Indigenous origin, specific community affiliation, technique, material, or maker. When cultural provenance matters, seek documented information and appropriately qualified sources.
Read the Dress in Four Black-Surface Conditions
Black changes character through surface and construction. A flat, light-absorbing dress creates strong separation around glossy or saturated-looking jewelry. A reflective surface adds moving highlights. A lace-like or open texture introduces many small edges. A dress with visible zippers, studs, buttons, or buckles already carries accessory information.
Make four notes rather than calling all of these simply black. Record reflection, texture density, hardware density, and movement. If reflection is high, reduce the number of jewelry surfaces that flash under light. If texture is dense, favor a clearly outlined focal piece. If hardware is strong at the waist, keep the wrist stack smaller. If the fabric moves widely, test whether cuffs or earrings contact it.
Repeat the photograph under daylight and likely evening light. Do not judge color accuracy from the camera; judge the distribution of attention. A piece can be visible in both settings yet change from a color focal point to a silhouette focal point.
Check Sleeve and Wrist Geometry Before Stacking
Measure the sleeve opening and note where it ends when the arm is straight and bent. Then request the cuff’s inner dimensions, opening, band width, and profile. These two sets of measurements determine whether the jewelry sits beyond the fabric, over it, or repeatedly meets its edge.
Sleeveless and short-sleeve dresses expose more arm, which can make one wide cuff look proportionally isolated. Two different-width cuffs may create a more deliberate sequence, but only if fit and contact are safe. A three-quarter sleeve naturally frames the wrist yet can strike a raised bracelet. A full sleeve may conceal the jewelry or catch during movement.
Test both arms. Bag carrying, dominant-hand activity, watches, and phone use create different conditions. The more active wrist is not always the best focal location. Choose the side with clearer space and less repeated contact.
Use a Focal-Area Ratio
Estimate the visible colored area rather than counting objects. Four narrow cuffs may create less coverage than one wide earring pair near the face, while several small accents can merge into a single block at distance. Photograph the outfit from six feet away and compare the approximate colored area at wrists and face.
If both zones appear equal, decide which one should lead. Reduce the secondary zone by removing pieces, changing hair coverage, or using a smaller visible option after verification. If one zone disappears entirely, a tiny distant echo may connect the outfit without creating competition.
This ratio changes with pose, so use arms at rest, one natural gesture, and the usual bag position. A wrist stack that looks restrained in a close-up can become bright when both hands move against the dress.
Arrival and Rehearsal Documentation
When the jewelry arrives, open it over a clean tray and compare every piece with the exact order. Photograph the cuff interiors, openings, ends, decorative surfaces, earring fronts, backs, closures, and connectors. Measure without bending. Note missing pieces, unexpected movement, rough edges, color transfer, or disagreement with the listing.
Keep the items unchanged while contacting the seller about a possible problem. Improvised bending, polishing, gluing, or cleaning can complicate both diagnosis and return. Retain packaging until the count, option, measurements, construction, and first comfort test are complete.
Create a five-column rehearsal card: look, fit, contact, security, and repeatability. Score each outfit formula after twenty minutes. A visually strong combination that scores poorly on fit or security is not a winning formula. The card makes subtraction an evidence-based decision rather than a failure of personal style.
Use the Video Without Treating It as Product Evidence
The supplemental video is Turquoise Necklaces by John Hartman. Its page was accessible during review, but no transcript was available. This article does not quote the presenter or use the video to verify either Oroxen product.
Watch the complete video to observe necklace density and placement, then ask whether adding a necklace would help or crowd the cuff- or earring-led outfit. Independently verify materials, origin, treatment, maker, value, and care. A necklace video cannot authenticate these bracelets or earrings.
Movement Tests That Work
Wear the completed look for twenty minutes. Use a phone, carry the intended bag, sit, walk, put on a jacket, and fasten a seat belt. Listen for repeated contact and inspect sleeves, wrists, hair, and closures afterward.
For concert use, add crowd density, dancing, weather, and venue restrictions. The public country concert jewelry checklist helps translate style into a real event plan.
Frequently Asked Questions
Can all four cuffs be worn together?
Only after individual fit, construction, and contact checks. Begin with one, then add pieces gradually. Do not reshape them unless the seller confirms an approved method.
Do statement earrings require a necklace?
No. A quiet neckline often makes the earrings more visible. Add a necklace only when it has a clearly secondary role and safe clearance.
Which product is more versatile?
Versatility depends on verified dimensions, comfort, wardrobe, event, and preferred focal zone. The set may offer several wrist combinations; the earrings may simplify the outfit by concentrating attention near the face.
How can beginners compare statement and everyday styling?
Use the public statement-versus-everyday wear grid and score visibility, comfort, contacts, and repeatable outfits.
How should the pieces be cared for?
Request option-specific materials and care. Until confirmed, keep jewelry dry, separate, and away from cosmetics, chemicals, impact, and improvised cleaners.
Final Works/Does-Not-Work Checklist
- Works: one leading zone and one distant echo.
- Works: exact measurements, documented materials, and movement testing.
- Works: adding cuffs or earrings in stages.
- Does not: assuming four cuffs must be worn together.
- Does not: treating screen color as an exact match.
- Does not: crowding hair, collar, necklace, and earrings.
- Does not: turning style labels into claims of material or origin.
Explore additional shapes in Turquoise Jewelry and Western Jewelry, then return to Oroxen for current product details. The black dress succeeds as a stage when the jewelry has one clear location, verified physical facts, and enough space to move.